We know most readers love to build web applications with the Laravel framework, and deploying these applications is a crucial step. However, while many know server management, only some are particularly fond of configuring and maintaining servers. Luckily, Laravel Forge and Envoyer are available to assist everyone!
When one is ready to deploy their Laravel application to production, there are some essential points that one can do to ensure your application is running as efficiently as possible. This blog will cover some great topics to ensure your Laravel framework is appropriately deployed.
Regarding our blog topic, you must have a brief about what Envoyer and Forge are regarding deployment.
Envoyer is a deployment tool used to deploy PHP applications, and the best thing about this tool is the zero downtime during deployment. Unfortunately, this indicates that your application and the customers must be aware that a new version has been pushed.
Laravel Forge utilizes SSH (Secure Shell Network Connection Protocol) to connect with the server and share data, unlike direct hosting of PHP apps. This makes it seamless for business units with multiple server setups or switching from one hosting provider to another.
Before we dive right into the topic, let’s skim through the;
The basic overview of the Laravel framework:
Laravel framework is an open-source, free PHP framework that renders a set of tools and resources to build modern PHP applications. It comprises a complete ecosystem leveraging its built-in features, range of extensions, and compatible packages. The growth and popularity of Laravel have escalated in recent years, with several developers adopting it as their framework of choice for a streamlined development process.
What is deployment concerning Laravel?
A deployment is a process in which your code is downloaded from your source control provider to your server. This makes it ready for the world to access.
It is accessible to manager servers with Laravel Forge. A new website is online quickly, queues and cron jobs are easily set up, and a more advanced setup using a network of servers and load balancers can be configured. While with Envoyer, one can manage deployments. This blog will give you an insight into both; Forge and Envoyer.
Laravel Forge
Laravel Forge is a tool to manage your servers, and the first step is creating an account. Next, one has to connect to a service provider; several cloud servers are supported out of the box, which includes Linode, Vultr, Hetzner, and Amazon. Moreover, you can manage custom VPS.
What are various methods of deployment using Laravel Forge?
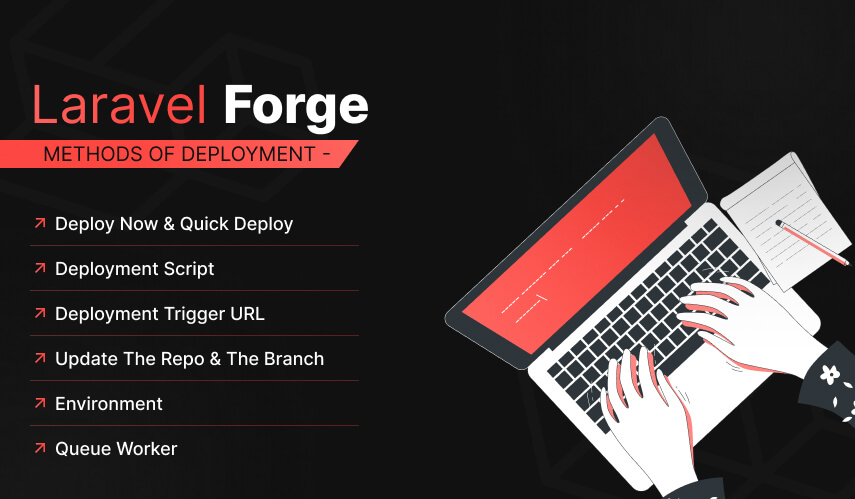
Deploy Now and Quick Deploy
The Quick Deploy feature of Forge allows you to quickly deploy your projects when you push to your source control provider. When you push to the configured quick deploy branch, Laravel Forge will pull your latest code from source control and run the application’s configured deployment script.
For deployment with Laravel Forge, one can manually deploy using the ‘Deploy now’ button. Alternatively, one can enable the Quick Deploy option that automatically deploys the project when you push code into the master branch of the chosen code hosting platform repo.
Deployment Script
The Default Deploy script pulls code from the repository, installs dependencies, starts the server, and runs migrations every time the app is deployed. This is what the deployment script looks like:
1 cd /home/forge/redmonark.com
2 git pull origin laravelapi
3 composer install --no-interaction --prefer-dist --optimize-autoloader
4 echo "" | sudo -S service php7.2-fpm reload
5
6 if [ -f artisan ]
7
8 then
9 php artisan migrate –force
Deployment Trigger URL
This option can integrate your app into a third-party service or create a custom deployment script. Then, when the URL receives a request, the deployment script gets triggered.
Update the Repo and the Branch
You can use these options if you need to install a newer version of the same project on a different repository or update the branch in Laravel Forge. If you are updating the branch, you may also have to update the branch name in the deployment script.
Environment
Laravel Forge automatically generates an environment file for the application, and some details like; database credentials are automatically added to the environment. However, if the app uses an API, you can safely place the API key in the environment. Even running a generic PHP web app, you can access the ENV variables using the getenv() method.
Queue Worker
Starting a queue worker in Forge is the same as running the queue: work Artisan command. Laravel Forge manages queue workers by using a process monitor called Supervisor to keep the process running permanently. You can create multiple queues based on queue priority and any other classification that you find helpful.
Deployment using Envoyer
While Forge can be used to deploy your Laravel code, deployment with Envoyer is a more suitable choice for this job as it has a zero-downtime setup and the ability to deploy to multiple servers.
You must be curious to know What the difference is between deployment via Envoyer and Forge:
When deploying an application using Forge, it creates a folder on your web server, such as instance.com. When deploying, all codes will be placed inside this folder, and the storage folder where the user uploads are stored within the instance.com folder. However, this simple folder structure may lead to downtime when something fails during deployment.
Envoyer solves this issue by making use of a different zero-downtime setup. While it does create a folder on your web server for your application, like instance.com, within this folder, there’s an envoy folder. This ‘envoyer’ folder consists of 3 sub-folders: current, releases, and storage.
The process of deployment with Envoyer works as follows:
- A new folder is created in the ‘releases’ folder, for every deployment,
- After the successful deployment, the ‘current’ folder will be symlinked to the latest release.
- With this setup, there will be no downtime when something goes wrong during the deployment.
Envoyer cleans up the old releases and keeps the latest four releases. If required, you can go back to a previous version. They are stored outside the releases folder and can be reached via a symlink to this folder.
Project Creation in Envoyer
The first step is to create an account on Envoyer and log in. A free trial is available via your profile page>integrations; you can link a source control system such as Bitbucket or Github. Enter the access token for the service you are using, and just like that, you’re ready to create your first project.
Click the ‘Add project’ button on the Envoyer dashboard and enter the form by joining a project name, repository, and default branch you would like to deploy.
Connecting servers
- Connect the server that you created in Forge earlier to this Envoyer project.
- Now, Go to the project and click the server tab.
- You can add one or more servers to which you should be deployed.
- Fill in the form; add a descriptive name for the server, its IP address, and use port 22, and connect as a forge.
- Select the PHP version used on the server and check the ‘Receives Code Deployments’ checkbox
- A new field appears wherein you can enter the project path. The project path is one to which the code should be deployed: /home/forge/domainname.com/envoyer.
Owing to the zero-downtime setup of Envoyer, one has to update the website’s root directory previously set in Forge.
- Go back to Forge, and navigate to your website.
- Click on the meta tab.
- Change /public to /envoyer/current/public in the web directory field.
With this done, you’re almost ready for your first deployment in the Laravel framework!
First Deployment:
Envoyer needs to be able to communicate with Forge, which is done via an ‘SSH’ key. You will find the SSH key under the ‘key button’ on the servers tab in Envoyer. Enter this key in the SSH tab for your server in Laravel Forge
The last straw to this hat is to add the environment file. Click the ‘Manage Environment’ button on the server tab in Envoyer. Now you have to enter an ‘encryption key,’ which will be used by Envoyer to encrypt your environment file, which contains access tokens and passwords.
Store it safely, for instance, in your password manager. And after choosing a key, add .env to your file.
Now you’re ready for the first deployment; click the ‘deploy’ button from the upper right corner, and everything will be seamlessly handled for you!
You can use deployment hooks if you wish to customize the deployment process. For instance, running migrations or clearing the cache of your applications.
Envoyer gives you the key to a healthy application:
While deployment is the primary feature of Envoyer, it also has some features to monitor the health of your application. To make this work, you must first set a notification channel through the corresponding tab in your Envoyer project.
You can choose Email, Discord, Microsoft Teams, and Slack. Then enter the webhook or email address, and you’re done! To monitor the website, go to your project settings and enter the ‘health check URL. Envoyer will ping this URL regularly and notify you when your application cannot be reached.
If your application uses cron jobs, Envoyer’s heartbeat can notify you when they stop running. You will find the heartbeats tab on the Envoyer project page. First, create a new heartbeat and select the frequency of your cron job; doing so will form a URL that can be pinged in the kernel file of your project.
Envoyer’ll notify you if those heartbeats are not pinged at the expected time.
Conclusion
This blog gave you an exclusive insight into the Laravel framework and deployment with Forge and Envoyer.
Laravel Forge and Envoyer are incredible tools that make deployment a cakewalk. Both the tools have tons of features and easy-to-use UI that lets you create and provision servers and deploy applications without hassle.
Numerous web app development companies are available in the market. However, the client searches for lucenta solutions to build their customized app. We code your imagination with 4D techniques, i.e., Determine, Design, Develop, and Deliver. With proficient team members, we can cross every obstacle coming across our path to success. Your satisfaction is our prime mantra!
Our actions prove our USP that we deliver what your mind imagines. Click here to contact us!